The SharePoint 2013 App store

OOTB (Out Of The Box) SharePoint doesn’t always offer all the functionality that a company or organisation requires. This is why sometimes add-ons and extensions are used or custom web-parts are developed to add new functionality which is not already available in OOTB SharePoint.

In SharePoint 2013 they have extended this idea to something called apps, and a centralized place to access and manage these apps – The App Store. Users can connect to the store from within SharePoint and they can search and browse for apps to download and install to the SharePoint environment.

They have also introduced the idea of an App catalog so access to these apps can be controlled by administrators. The App catalog will contain only the Apps that have been selected and approved by the administrator.

All apps in the app store have been approved by Microsoft and the end user process of installing and managing the apps has been made really easy with the SharePoint 2013 user interface.

SPapp pic

If you would like to have a look at of some of the apps available in the SharePoint 2013 App store you can browse the store using this link –

http://office.microsoft.com/en-us/store/apps-for-sharepoint-FX102804987.aspx

Troubleshooting UPS in SharePoint explained!

Lots of people are looking at or in the process of migrating to SharePoint 2013, but there are still lots of SharePoint 2010 systems that still need maintenance.

In the world of SharePoint, the function of moving user information from AD to SharePoint is usually referred to as “User Profile Synchronization”

We recently had an issue with a client who had a problem with the UPS in SharePoint 2010 and needed some help to get it working again.

A little bit of background, this client had extended their Active Directory Schema with some custom attributes, which were mapped into SharePoint, also when a new employee started they added information into a SharePoint profile that was stored in the Profile Database and nowhere else, so a key requirement was to ensure we could get the UPS working again with no data loss.
Within the SharePoint platform a number of components are used to provide this function, some are in the ‘core product’, some are outside of the ‘core product’ but are still key to the function.

Within the ‘core product’ there is:
User Profile Service Application – This is the container within SharePoint for everything to do with Users and profiles

The Synchronization Connection – This tells SharePoint which AD to connect to and allows for the credentials of the AD Sync Account to be entered

The User Profile Service – Deals with internal SharePoint requests for user profile information.
The User Profile Synchronization Service – Deals with the flow of profile information from and potentially to AD


NKUPSimage 1

The FIM (Forefront Identity Manager) Windows Services – these deal with the actual talking to AD.

nkups image 2

The FIM Client Tool –or manager tool can be used to review the sync Logs
Outside of the ‘core’ product we have the User Profile and Synchronization databases

nkupsimage3

AD Sync Account – The account is configured with special permissions within Active Directory allow the profile sync to work.

Looking at SharePoint we could see that all the components in SharePoint are running, but the sync log was showing connection failures when trying to talk to AD with the error “Invalid Credentials”

nkupsimage4

Which means “Authentication is not possible using the supplied credentials.”, This suggests that the AD sync account credentials need to be refreshed in the AD connection string.
When trying to open the AD connection we are getting the following, no AD connection is showing.


nkupsimage5

We used information in the original Design Document to create a new AD connection

nkupsimage6

Trying to Save the connection gave this error, and the connection was not saved.

nkupsimage7

Generally this means that the Windows Forefront Identity Manager Service is not running, but it was in this instance, so we restated this service but received the same error.

The next step is to re-provision or redeploy the FIM configuration, this is simply a case of stopping and starting the User Profile Synchronization Service, starting this service is a common problem and it often gets stuck in either the “stopping” or “starting” status, As a precaution we deleted all the Forefront certificates from the local certificate store as this is a common restart problem as new certs will be added by the FIM tool.

nkupsimage8

The User Profile Synchronization Service failed to restart (Provision the FIM) the following is the ULS Log showing the failure, the FIM will have 4 retries then stop.

nkupsmissing

The matching error in the event log seems to be this

nkupsimage10

Referring to the article below, step 13 appears to be failing, trying to update the Management Agents that have been created in the Sync database.
http://blogs.msdn.com/b/spses/archive/2010/12/02/guide-to-user-profile-service-application-upa-part-2-setting-up-the-user-profile-service-application.aspx
This indicates that the we need to reset the Sync database, I used this article http://technet.microsoft.com/en-us/library/ff681014(v=office.14).aspx#resetSync
To reset the Sync database, this has allowed the User Profile Synchronization Service to re-provision

nkupsimage11

Trying to create new AD connection gives this error

nkupsimage12

An IIS Reset brought the screen back.
We were now able to create a new connection and kick off a Sync.

nkupsimage13

nkupsimage14

Embedding Videos in SharePoint 2013

In SharePoint 2010 if you want to embed external content, like YouTube videos for example, you need to use an HTML from web part or some other special part. However in 2013 you can embed directly to the HTML content on an article page.

To use this feature just click video and audio under INSERT and then click Embed.

BLOGfmApril 1


Paste the embed code of the YouTube video (or any other web content you would like to embed)

BLOGFMAPRIL 2

You will notice that SharePoint automatically shows a preview of the video.

Click insert and this video will now be displayed on the page.

blogfmapril 3

It is saved as a snippet which can be moved and positioned on the page as required.

This is a really cool feature of SharePoint 2013 which makes it easy to embed external content on your site.


Using ULS viewer to troubleshoot errors in SharePoint 2010

As a SharePoint administrator you or an end-user may have been presented with an error message in SharePoint like the one below.

imageFM

The correlation ID in these errors correspond to an entry in the ULS log which by default in SharePoint 2010 can be found at

C:\Program Files\Common Files\Microsoft Shared\Web Server Extensions\14\LOGS

These logs can be opened and viewed in notepad but are very hard to navigate when trying to find what you are looking for, however there is a tool called ULS viewer which can be very useful in this instance.

The log file can be opened in ULS viewer and it will be displayed in a user-friendly format. You can then perform advanced functions such as searching, filtering, sorting, highlighting etc and single out the data that is important.

image2FM

The ULS Viewer can also be run in different modes. If you run ULS viewer on a machine running SharePoint 2010 the logs will be shown in real-time. You can then filter message level by clicking the icons in the middle and it will tell you what is going on inside SharePoint.

Image3FM

Another very useful feature is the Toggle Correlation Tree button. This allows you to select the correlation ID from a tree on the left panel and all entries for this ID will be displayed.

Image4FM

You can also set up notifications to pop up for critical messages.

IMAGEFM5

As you can see this tool is very useful for troubleshooting errors in SharePoint. It can be downloaded for free so give it a try.

http://sharepointlogviewer.codeplex.com/

Let us know how you get on!

SharePoint 2013 Continuous Crawl

What is it?

In SharePoint 2010 you have Full Crawls and Incremental Crawls. You can schedule both crawls and often the Incremental Crawl is scheduled more i.e. multiple times through-out the day. With Incremental Crawl all content changed since last crawl is retrieved and indexed but the results may not be as accurate as anticipated.

SharePoint 2013 introduces a new continuous crawl feature to improve content freshness. While the crawl is still set for a fixed interval, this “3rd” crawl mechanism does help to keep SharePoint content significantly more up to date. Continuous crawls are only available for content sources that use the SharePoint Sites content source type.

Full Crawl

A “Full crawl” crawls entire content under a content source. This is dependent upon two settings specified at the time of creating the content source “Content Source type” & “Crawl Settings”.

Incremental Crawl

An “Incremental crawl” crawls the content which has been added/modified after the last successful crawl; therefore you can have this set to crawl multiple times a day.

Why is it better than previous crawler’s?

Unlike “Full” and “Incremental” crawls, multiple “continuous” crawls can run at the same time. Also, a continuous crawl does not process or retry items that return errors in order to improve speed.  This means that you still need an incremental crawl to update any items that return errors. The incremental crawl will retry items and postpone crawling the item if the error persists.

 To enable continuous crawl on an existing Content Source:

  • Open Central Administration
  • Then Application Management >Manage Service Applications > Search Service Applications
  • On the Search Administration page click “Content Sources” on the left side navigation
  • Hover over the Content Source you want to manipulate and click “Edit” from the drop down

image DC

  • Then select the “Enable Continuous Crawls” radio button

ImageDC1

How can it help?

Crawlers are running in parallel and due to this the crawler can get changes from the SharePoint sites every 15 minutes. This is the default setting and it can be changed using PowerShell. When a crawl is executed and finished it continues to crawl immediately in spite of the length. When a crawl is taking more than 15 minutes to handle the content set another crawler is started.

It is even possible that a second crawl is started only a few minutes after the first crawl, this way the newly added or changed data is almost immediately available through the search.

With continuous crawling; data is almost immediately ready for searching. There are no more issues with incremental schedules and big data which can cause missing schedule windows. Using continuous crawls and the content by search web parts now give us opportunities to build exciting search driven solutions within your environment.

Site Policies in SharePoint

For anyone who has used SharePoint for a while will be familiar with the issue of site and content sprawl, without strong governance rules SharePoint can quickly become a mess of sites and sub-sites with varying degrees of content quality. Some might be old and some might be current, it can be hard to tell.

With SharePoint 2007 & 2010 the only option we had to help with this issue was the Site Use Confirmation and Deletion tool. This is quite a blunt instrument that can be used to delete an entire site collection after a configurable number of emails are sent to the site collection owners after a period of non-use. However this can only be configured within SharePoint Central Administration, an area of SharePoint that most information workers would not have access to.

With SharePoint 2013 we now have a new site collection feature “Site Policies” which is available to help with site governance and can be controlled at Site collection level, by business owners assigned as Site Collection owners.

To access this feature we go to Site Actions (gear symbol) > Site Settings > Site Collection Administration and select the Site Policies link.

pic 1

Once inside the Site Policies page we can edit any existing Site Policies or create a new policy from the Create link.

pic 2

Setting up a new Site Policy is simply a case of adding a name and description and selecting the Policy setting for site closure and deletion events.

pic 3

With Site Policies we have a couple of options, Site Deletion and Site Closure.

 Let’s take a look at these options in more detail

Site Deletion

pic4

Quite simply this allows for a site to be automatically deleted according to 2 event dates, Site created or Site closed.

The site owners that the policy applies to can be notified by email of the site deletion event, and can choose to postpone the event, SharePoint also shows the deletion date on the site home page.

pic 5

The site policies are controlled by the same timer job as all other SharePoint expiration jobs, the Expiration Policy timer job.

pic 6

By default this timer job is scheduled to run once a week per web application, so your target site might not be deleted for up to week after its target date.

pic 7

Once the Expiration Policy timer job runs your target site is deleted, in the SharePoint 2010 world that would be it your site has gone, however as this is SharePoint 2013 deleted sub sites are now available in the site collection recycle bin if the inevitable happens and you are asked to recover content from the deleted site.

pic 8

Be aware that unlike SharePoint 2010 there is no longer link to the Site Collection Recycle Bin from the End User view. You now have to go to Site Settings > Site Actions > Site Collection Administration > Recycle bin > Deleted from end user Recycle Bin

pic 9

pic 10

Site Closure

This is a new concept in SharePoint 2013, a closed site is one that is available to be deleted by a site policy.

pic 11

A closed site will not appear in any locations where site membership is aggregated, but the site is still fully available and can be accessed via its URL, once closed a site owner can if needed reopen a site.

pic 12

What are the differences between Remote BLOB Storage and External BLOB Storage

Introduction

SharePoint stores everything related to an object in SQL Server, this includes the:  

  1. Metadata (the object’s title, project number, format, etc.)
  2. Context (which site it came from, the folder location, security details, etc.)
  3. Content (PDF’s, PPT’s, Zip files, etc.)

Metadata and context belong in SQL Server because they are represented by structured content. Storing content in a database is not ideal due to the high amount of data it will hold within a database. Due to this the binary objects will need to be removed from the database (not necessarily out of SharePoint but out of SQL Server).

This is where RBS and EBS become a method of performing such a task.

RBS (Remote BLOB Storage)

RBS is implemented by SQL Server (only SQL Server 2008 and later) and is nothing to do with SharePoint directly. When you enable RBS, all BLOB streams that SQL Server would normally be forced to store internally are moved to the file system.

EBS (External BLOB Storage)

EBS is implemented by MOSS 2007. The EBS provider lives at the very bottom of the SharePoint stack, just above the interface in to SQL Server. Just before the BLOB is passed to SQL server the EBS provider gives your process the opportunity to optionally take ownership of the BLOB.  You give SharePoint a token in exchange so it knows how to get the object back from you at a later date. 

IMAGE 1

How External Blob Storage and Remote Blob Storage Works 

Pros and Cons

Remote BLOB Storage (RBS)

Pros:

  • RBS is implemented in SQL Server. If you turn RBS on then all BLOB objects from any SQL Server-based application will be externalised. If that’s what you require then that will work but if you need to be able to apply business logic to what is externalised and where it goes then you are severely restricted.
  • Content is simply stored on to the local file system if you turn RBS on. If you have some kind of file system virtualisation software in place then you can do some basic management tasks but only based on the file system attributes of the object.
  • If you want access to the context and metadata of the object then you are going to have to look in to SQL Server and start locating SharePoint based reference information in which isn’t a recommended practice by Microsoft as this could be potentially dangerous.
  • It is likely that RBS might have more performance, as it is likely that EBS will fade out over time.

Cons:

  • Getting the content out of SQL Server only solves a small amount of the real issues. Placing the BLOBs out of SQL Server gives you scalability but it does not deliver any of the IT efficiencies or benefits of managing the externalised content.
  • If you need to have the BLOB, the metadata, the context and the ability to manage the object then intelligent archiving is the key to getting this right. The RBS model only provides the BLOB i.e. no context and no ability to manage the object.
  • RBS is all or nothing; you get all BLOBs all of the time without any business rule mapping. EBS is not much better but does support certain rules. As an example; in theory you could configure EBS to not externalise content from certain sites or content less than 100KB in size.
  • SQL Server 2008 is required


External BLOB Storage (EBS)

Pros:

  • EBS is provided by the SharePoint team. Due to this it does understand the context of the BLOB that it exposes. In other words; we do know what the BLOB object is and we can track changes on the object.
  • The architecture allows us to provide an intelligent process for capturing the BLOB and just as importantly for returning the BLOB on demand i.e. when you want to view it from SharePoint.
  • Due to the interacting directly with the SharePoint processes we can perform more intelligent operations e.g. if the BLOB was deleted from the store then we could cascade that delete back up to SharePoint.
  • It does not require SQL Server 2008.

Cons:

  • The only con is that EBS will probably not continue in the long term. A transition to RBS in the future, from EBS, should be seamless.

 A thought…

Therefore, in the question of EBS vs RBS, neither is a “better” option. It does appear that RBS seems likely to stay longer but EBS does have an existence for the time being.

Search in SharePoint 2013..increased functionality makes it simple!

One of the search features introduced with SharePoint 2010 was the concept of search refiners and this really gave power to the users to filter and work with search results. This capability was surfaced as the Refiner Panel in the search results pages and was driven by metadata values assigned to the content. The benefit of this was that users can work with large results sets and narrow down the search results based on meaningful business criteria.

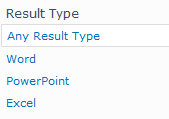
Out of the box, the standard refiners were based on metadata generated directly by SharePoint and users were not able to configure these to their liking. The types of refiners that would typically be made available include Result Type (the type of file such as a Microsoft Word or Microsoft Excel document), the Author of the piece of the document, the Modified data etc.

pic 1pic 2

Whilst it was quite possible to add new refiners in SharePoint 2010, the process was quite complex and needed custom properties to be set-up and mapped by hand using administrative tools. In addition, one would also need to manually edit the refiner web part XML configuration file which is not a simple task. Generally this kind of work would be beyond the scope of an information or knowledge worker, which is where this level of functionality was aimed, and would need to be carried out by an administrator. With the introduction of SharePoint 2013, this level of functionality is now far more accessible to the information worker, with only a little help needed from the farm administrator.

So let’s take a look at the steps needed to make this happen in SharePoint 2013..

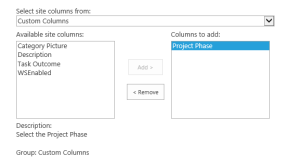
For this example we are going to create a new metadata property, in the form of a site collection column, to show typical project phases such as preparation, design, development, test, delivery and support.

pic 3

Once the site column has been created, it needs to be added to a document library and populated with data, using a few sample documents.

pic 4

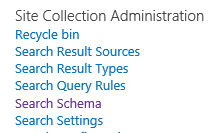
Now we need to involve the farm administrator and request that a full crawl is ran, so that it will pick up the new site column and make it available to us. After a full crawl has run we can take a look at one of the new site collection options in 2013, Search Schema.

pic 5

if we go into this option and search for our newly created site column we can see that SharePoint has not only created some new crawled properties based on our column, but has also created a new managed property and created that mapping for us, something that we had to do manually in SharePoint 2010.

pic 6

If we click on the mapped property link and scroll down to the Refinable setting, we can see that the control is not available at this level, at this point we need to enlist the help off our farm admin for the last time.

pic 7

When the administrator looks at the same property within central search administration the ‘Refinable’ control is now available to be set.

pic 8

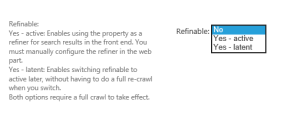
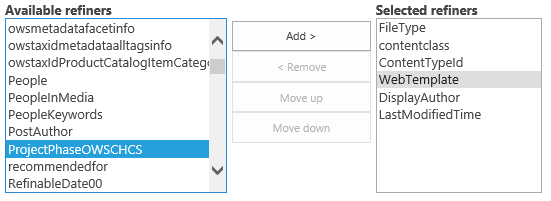
If they select Yes – active and run a full crawl, the new refiner option will be available for use in the refiner web part. To add the new refiner all we have to do is simply edit the results.aspx page then edit the refiner web part and select ‘Choose Refiners’.

pic 9

And we now have a new refiner all ready to use, fully populated, and no more XML editing needed.

pic 10

Once we have added our new refiner we get a real-time sample and the ability to change the display name, template, sort direction etc.

pic 11

We now have a fully functioning search refiner available for our end users.

pic 12

As this refiner is based on the site collection, all locations where this is used will automatically be added to the index set once it has been crawled and it will be available in the search results.

Overall this is a really easy to implement, and a straight forward method to add extra value to your enterprise search results at no cost.


New Features Admins Love SharePoint 2013: Active Directory Import without the SP2010 Headaches

The arrival of SharePoint 2013 has given birth to many new changes, these changes being primarily aimed at end users and the overall end user experience! Let’s not forget the changes made for the Admins, Developers and Techies too!

A noteworthy change which should be recognised and celebrated amongst all admins is the ability to sync user profiles from active directory, without having to use the infamous user profile synchronization service!

For those unfamiliar – in SharePoint 2010, the User Profile Synchronization service was commonly used to import and sync user attributes from active directory into SharePoint, This is getting your individual active directory information about your users (such as department, email, telephone number etc.) populated and useable in SharePoint.

Which Administrator or developer among you…

  • Has not run into issues using this service application?
  • Has not had the need to add the SharePoint Farm admin account into the local admins groups on the server and then justifying it later to those that have to nod off such actions!
  • Has not encountered problems with getting the User Profile Service application instantly up and running?
  • Has not suffered the phenomenon of the stuck on ‘Starting’ screen where minutes of your precious life, ticked away while waiting to only later find said service stopped again after a while! And having to repeat the whole process again!

It’s all over now!

Instead, you can now opt to use the new SharePoint Active Directory Import feature.

Rather than using Forefront Identity Manager (FIM) (as was the case in SharePoint 2010 and how things worked) in SharePoint 2013, the direct import works without starting the Synchronization Service in SharePoint (which is used for communication with the FIM configuration)

Instead the direct import services are based on User Profiles.

In SharePoint 2013 it is now a simple matter of configuring the type of import, configuring the connection to the directory and then running the Synchronization …

That’s all.

Where can you find it?

You can find this in central admin in your User Profile Service Application:

Image 1

Configure Synchronization settings and select “Use SharePoint Active Directory import”

image 2

Once this is completed, you can configure a synchronization connection of type Active Directory Import

image 3

image 4

image 5

Not only can you make use of LDAP filters for this connection type, which gives you a much more fine-grained control of filters not possible with User Profile Synchronisation but…Best of ALL: Synchronization is much faster!

There are still some limitations (unfortunately)… such as mapping to system SharePoint properties is not supported. Mapping two different AD attributes to the same SharePoint property is not supported, the ability to upload to Active Directory (AD), the interface for selecting containers in the synchronization connection not changing, and there is no check in the interface to whether or not the account specified has “Replicate Directory Changes” enabled for it (which is also still required).

But overall it is still a huge step forward!

Although, this connection type is import only, (and you still need to provide ‘replicating directory changes permission to the account you choose for the sync) if you did however want to upload/write back to Active Directory (AD) you will still need to use can still use the good old User Profile Synchronization instance and still can as it is possible to change from AD import to UPS and back again without hassle!

From current trends the need to write/upload back to AD is really high for many places. So if import is your only requirement this will definitely rank high on your list of why you love 2013 more!

However, the synchronization connections are not interchangeable. This is due to the fact that, with AD import, the synchronization connection is stored in the Profile DB whereas for UPS  is stored in the Sync DB.

Looking for that particular record in SharePoint? What’s the best practice for your organisation SharePoint, Folder or View?

Do you face the challenge of how to best organise your records in SharePoint so that everyone can find and locate the information they require as seamlessly as possible without having to ask someone where to retrieve the information from?

SharePoint is quickly becoming an extremely popular document content storage solution for various sized organisations throughout the world. The different functionality, configuration and scaling options SharePoint provides opens up hundred of different ways to set, configure and use the platform for document content storage needs without any particular method which ensures that the option of setup is right for an individual organisation.

As SharePoint users ourselves we have devised the pros and cons for both which can leave you to decide what works best for you. The pros and cons are based on using the standard folder hierarchy against the more recommended method of view sorting for locating and retrieving records.

About Views

Using Views is a useful way for a list managed to create different ways to show the information in a list or library. Different views may show different columns and have different sorting, filtering, grouping and styles. In SharePoint, Views can be either public whereby the views are available to anyone to access or private which only allows the user who created the view access.

Image1. Example of SharePoint View

Image1. Example of SharePoint View


View Pros

  • A great method for classifying content information e.g. labels, tags, keywords etc.
  • Indexing metadata can be used for keyword searching and also be used to control the order in which items are displayed i.e. list views
  • Can be used to group list items together
  • Security is managed at the library/list level which is less time consuming than managing via subfolder level

View Cons

  • Can be used to control the navigation but it can be a labour intensive task through using web parts to configure
  • User initially might not want to switch from using a folder hierarchy so implementing the best practice and training on how to use would be suggested

About Folders

The folder structure has been used throughout nearly all versions of computing e.g. websites, shared drives etc. Although end users are typically comfortable with working with folder structures it is seen as an out of date way of storing and retrieving content.

Image2. Example of SharePoint folder structure

Image2. Example of SharePoint folder structure

Folders Pros

  • Can use security to control permissions and access to certain areas
  • It can control the content types and ordering that users can create via the toolbar
  • The ease of navigation for folders is an instinctively common approach

Folder Cons

  • URL length breaks after 260 characters
  • Difficult to navigate if you don’t know the folder structure
  • Can’t go back up a level and you can only go back up to the root level

What we can determine is that Folders and Views each have their own capabilities and influence on SharePoint information architecture. To determine best practice Folders should be the exception and not the rule!

What method are you currently using? which are of these methods will be best practice for your organisation? and know when to utilise, implement and define the correct configuration for your organisation?